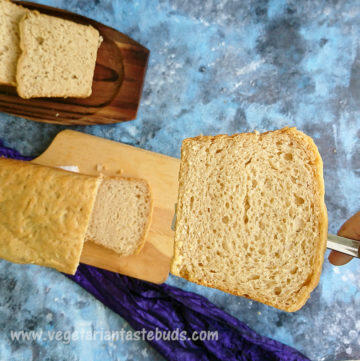
Whole Wheat Bread Recipe | eggless soft wheat bread recipe
100% whole wheat bread that is soft and airy
Loved this recipe? Leave a comment below and give us a 5★ rating
Ingredients (1 cup = 240 ml)
For the sponge & yeast fermentation
- 1 cup wheat flour (gehun ka atta)
- 1 cup lukewarm water
- 1 ¼ teaspoon instant dry yeast (or 1.5 teaspoon active dry yeast)
- 1.5 tablespoon granulated sugar
For the dough
- 2 cups wheat flour (gehun ka atta)
- 1 teaspoon salt
- 2 tablespoon curd/dahi
- 1-2 tablespoon lukewarm water or as required
- 2 tablespoon oil + 1 tablespoon butter
- extra oil for kneading, coating dough
Instructions
- Through a very sieve, sift wheat flour and set aside.
For the sponge & yeast fermentation
- In a big bowl, combine 1 cup warm water, yeast and sugar. Water should not be too hot, it should be just warm. To test, dip your finger in it, if you are comfortable then temperature is ok. If you feel it is hot then let it cool down a bit.
- Stir well till no lumps remain. If you see that there are lumps of yeast in the mixture, heat the mixture for a few seconds. Once you see that there are no lumps, then gradually add 1 cup wheat flour and stir well.
- Once everything gets mixed well, cover and set aside for 1 hour. Take a big bowl, since mixture will rise by 3 times.
For the dough
- After 1 hour, add remaining 2 cups wheat flour and salt to the frothy yeast mixture. Mix well till everything gets combined well.
- Then add curd and little water (about 1-2 tablespoon) and form a dough.
- To it add 2 tablespoon oil and knead till oil is absorbed in the dough.
- Sprinkle a little flour on a flat surface and place this dough on it. Knead well for a total of 10 minutes. The texture of dough kneaded by this method, will be more light and airy, as compared to the regular bread dough.
- After 5 minutes of kneading, add 1 tablespoon butter and knead for another 5 minutes. Knead until you get a smooth dough.
- How to know when the dough is ready :Knead the dough for 10 minutes, but do not over-knead. Once ready, dough will become elastic - you will be able to easily stretch the dough and dough will not stick to the surface in which you are kneading the dough.
- Once you are done with kneading, wash your hands so the dough doesn’t stick more. Texture of the dough should be smooth and not sticky.
- Shape the dough into a smooth ball and tuck the edges inside. Take a bowl, grease it with some oil and place the dough in the bowl. Coat dough with oil, cover the dough with a kitchen towel or plate. Keep aside to rise for 45 minutes – 1 hour or till dough doubles in size.
- Grease a baking tin with generous amount of oil/butter.
- Once the dough doubles in size, grease your palm with oil, punch the dough and knead lightly for about a minute.
- Spread oil on a flat surface and place dough over it. Flatten the dough into a rectangular shape with your fingers. Measure it with your baking tin just as shown. We have used baking tin of 10 inch x 4 inch.
- Start rolling from one edge and roll lightly. Flip the roll and pinch the dough. Also, fold both the edges and pinch lightly to seal.
- Place the loaf into greased baking tin, cover and let it proof for another 30-35 minutes.
- Pre-heat oven to 180 degrees Celsius.
- After 30-35 minutes, brush the top of bread with oil and bake in preheated oven at 180 degrees Celsius for 35 minutes or until the top turns light brown.
- Once baked, take it out of oven. Top part will be hard. Immediately apply butter on top.
- Cover and let it cool for 15 minutes. Then invert and keep on a wire rack. When you will invert, the bottom part will be slightly soft, but it will be ok once it cools down completely.
- Again cover and let it cool down completely on the wire rack for atleast for 2-3 hours.
- Once the bread cools down completely, slice with serrated knife. Enjoy.
Video

Notes
NOTE: This recipe yields 1 loaf (10 inch x 4 inch)
TIP 1 - What is Sponge Method in Bread Baking
The sponge method of bread making divides the recipe to prepare bread in 2 stages -
In the 1st stage a mixture of flour, yeast, sugar and water is prepared and allowed to ferment for a time period.
In the 2nd stage, bread dough is prepared TIP 2 – For the sponge, combine only water, yeast and sugar first and mix till no lumps remain. Only after there are no lumps, proceed to add flour. TIP 3 - Take a big bowl to ferment the sponge, since mixture will rise by 3 times. TIP 4 – How much additional water to add to the dough Only add water as required to the dough while kneading, since we have added 1 cup water to the sponge. Otherwise dough will be very sticky and difficult to manage. TIP 5 - Texture of the dough with sponge method The texture of dough kneaded by this method, will be more light and airy, as compared to the regular bread dough. TIP 6 - How to know when the dough is ready for 2nd proofing (after we add sponge to the dough)
Knead the dough for 10 minutes, but do not over-knead. Once ready, dough will become elastic - you will be able to easily stretch the dough and dough will not stick to the surface in which you are kneading the dough. TIP 7 – Do not knead too much before 3rd proofing TIP 8 – For the 3rd proofing, let it proof for 30-35 minutes. Do not keep to proof for too long. TIP 9 – After baking, wait for 10-15 minutes before unmoulding the bread from tin TIP 10 - Let the bread cool on a wire rack for at least 3 hours before slicing. Keep covered.
Nutrition
Calories: 122kcalCarbohydrates: 26gProtein: 3gFat: 1gSaturated Fat: 1gCholesterol: 1mgSodium: 196mgPotassium: 39mgFiber: 1gSugar: 2gCalcium: 9mgIron: 1mg
Subscribe to our Youtube Channel to get the latest Recipe Video updatesCLICK TO SUBSCRIBE
If you have tried our recipes, do share your recipe pictures with us on InstagramMention or Tag @vegetariantastebuds #vegetariantastebuds